
Technical Tip
You must select the Standing button if you want to allocate part of the payment to a different debtor.
Complete this procedure if you don't want to post a payment against a specific invoice, i.e. you want to post it as open and unallocated. You can also use it to allocate part of a payment to another debtor's account.
Refer to "Debtor Payments - Open Item Debtors".
|
|
|
Technical Tip You must select the Standing button if you want to allocate part of the payment to a different debtor. |
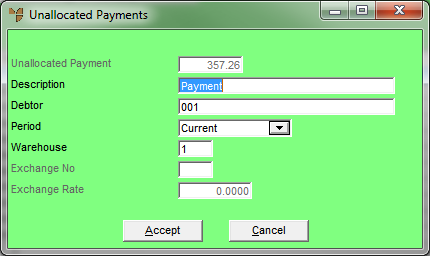
Micronet displays the Unallocated Payments screen.
|
|
Field |
Value |
|---|---|---|
|
|
Unallocated Payment |
If you selected Accept on the Debtors Payments - Open Item screen, Micronet displays the total amount for this payment as entered on the Debtors Payments screen. You can't change this. However, if you selected the Standing button, you can enter the portion of the total payment amount you want to allocate to the debtor selected below. |
|
|
Description |
Enter the description you want stored against this payment for future reference. |
|
|
Debtor |
Enter or select the debtor ID that you want to assign this payment to. |
|
|
Period |
Select the GL period in which this payment should be posted. |
|
|
Warehouse |
Micronet displays your default warehouse. You can change this if required to enter the warehouse number that this payment should be posted against. |
|
|
Exchange No |
If multi-currency transactions are enabled in your company, enter the exchange rate ID that applies to this debtor. You can also press Tab or Enter to select an exchange rate. |
|
|
Exchange Rate |
Micronet displays the current exchange rate from the Exchange Rates master file. You can change this if required. |
|
|

|
Reference The last two fields are only activated if the Use Multi Currency Debtors field on the Debtors Configuration screen is set to Yes – see "Edit - Program - Debtors". |
Micronet redisplays the Debtors Payments - Open Item screen and updates the Posted and Left fields.
Micronet posts the payment and redisplays the Debtors Payments screen where you can enter another payment into the batch.
Micronet redisplays the Debtor Batch - Payments screen. See "Managing Completed Debtor Payments Batches" for information on this screen.